
I usually only bake with freshly milled einkorn or spelt flour. During our trip to the States I didn’t get to bake with “real” fresh flour, I didn’t have a flour mill in my suitcase, only my sourdough… So… I used Jovial instead
If you don’t have a flour mill and want a delicious artisan einkorn loaf, then this is it!
However, it isn’t super simple. You will need to learn the technique of this loaf and when you get a hold of it, it will seem rather straight forward. So, it’s all about practicing. It is a loaf that rather easily can be baked every other day, without a lot of fuzz.
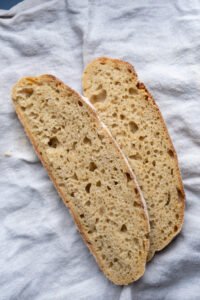
It is an Einkorn artisan loaf with a beautiful crumb and flavor, you will never need to buy bread again if you learn to bake this bread properly, which is the idea behind it I guess?
Einkorn is very different from wheat and spelt. It gets super sticky and it does not rise like wheat at all, so do not expect that. That doesn’t mean you have to end up with a dense bread at all though. You can get a beautiful moist crumb with Einkorn too but it takes practice and you will have to respect the recipe down to the gram, read it thoroughly through before baking and follow it. Use a metric food scale to weigh off the ingredients precisely, it is needed, unless you want a sloppy mess or a dense and dry loaf. Einkorn is not easy and mixing it too much is not a good idea either, it just get stickier. Just like adding too much water makes it impossible to work with and adding too much flour will lead you to a dense and terribly dry loaf.
But if you follow the recipe below you will get sticky fingers at times but I promise you will get a beautiful and super tasty loaf of bread too.
So let’s get started!

Einkorn Artisan Bread with Jovial All purpose flour
Equipment
- 1 Danish Whisk (Optional)
- 1 Big Ceramic Mixing Bowl
- 1 Proofing Basket (I use a traditional 8" round banneton basket with a linen insert)
- 1 Dutch Oven
- 1 Proofing Cloth/Cover (I use one in pure linen, but you can use a tea towel in pure cotton, just remember to wet it)
Ingredients
Levain
- 60 g Sourdough (Active and bubbly)
- 60 g Jovial All Purpose Flour
- 40 g Filtered Water
Autolyse
- 500 g Jovial All Purpose Flour
- 285 g Filtered Water
Bulk Fermentation
- 11 g Unrefined Sea Salt (I use Fleur de Sel or Celtic Sea Salt)
- 70 g Filtered Water (Split in two 2 x 35g)
Instructions
- Make the Levain by mixing the active sourdough with water and flour. Mix it together and leave to rise in a covered jar in a warm spot until it has doubled. This can take 1-3 hrs depending on the temperature, during Summer it usually takes around an hour and during Winter it can take 4 hrs.
- Mix the flour and 285g of water in a big mixing bowl and cover it to autolyse until your leaven is ready, this will usually be around 2-3 hrs. Do not overmix, just leave it when it looks like this, all the flour does not have to be combined with the liquid. Overmixing Einkorn is a no go, so don't worry everything will be combined in due time.

- When the leaven is ready, just splash around 35g of water onto the dough and add the leaven and mix it all together. Leave it covered for 30 mins.

- When the dough has rested, add the remaining water by splashing it all around the top of the dough and sprinkle the salt evenly across the dough. Now, mix these saline puddles thoroughly into the dough. Cover the dough and leave it covered for 20 mins.

- Now it's time for the bulk fermentation. Fold the dough by stretching it so it covers itself without breaking, turn the bowl one quarter and repeat stretch and fold until you have done 4 sets. Cover the dough and leave it covered for 15 mins.
- Repeat 4 x stretch and fold, cover and leave to rest 15 mins.
- Repeat 4 x stretch and fold, cover and leave to rest 30 mins.

- Repeat 4 x stretch and fold, cover and leave to rest 30 mins.

- Repeat 4 x stretch and fold.

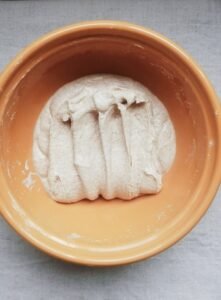
- Now it is time to gently transfer the dough from the mixing bowl to the banneton basket. Generously flour the banneton basket (I use millet or white rice flour for this and I always use a linen insert for the basket, this makes it incredibly easy to transfer the loaf). Transfer the dough from the bowl to the banneton, be gentle, try to get it as smoothly into the basket as possible, we do not want those air bubbles to deflate. Cover the basket and leave it to rest for 1 hr 30 minutes in a warm spot. We want the centre of this dough to reach 75-76 ℉ before proofing it overnight in the fridge. I check the temp, simply by using a pen thermometer. just stick it into the dough during the end of the bulk fermentation. Reaching this temp will improve your loaf, so don't forget this simple trick!
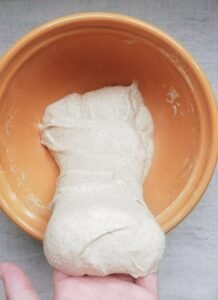
- When the resting time has passed, simply pinch the dough to shape it before cold proofing. I usually use this technique to shape it a last time before baking (yeah we are not going to mess more with this loaf before baking), I always wet my hands before doing it, it works like a charm.

- Cover the loaf and put it in the fridge, preferably in the least cold area for 8-10 hrs.
- Preheat the oven to 482℉ with the Dutch oven inside for at least 30 minutes and preferably an hour.
- While the oven preheats, take a piece of parchment paper and cut it into an oval shape that can carry your loaf. It must be the size of your bread and have two big snippets one on each sides. This will ease placing the loaf into the Dutch oven, without dropping it and it will make it super easy to remove the loaf after baking.
- When the oven is ready, put your parchment paper on the top of the banneton holding tightly and then flip it gently onto the table so the paper is underneath the bread.
- Take the Dutch oven from the oven and place the loaf inside holding the snippets and put on the lid.
- Score the bread in your desired pattern. I prefer making a rectangle with a cross in the middle or a classic "épi" (ear of the grain) score. Einkorn is difficult to score if you do it before the Dutch oven it usually won't get deep enough because the dough is very wet and looses it shape fast.
- Place the Dutch oven on the middle rack and bake on 482℉ with the lid on for 20 minutes.
- Remove the lid and bake for 25 minutes at 392℉. If you get a hollow sound when you knock on the top of the bread, it's done!

- Leave to cool off on a cooling rack for a minimum of 2 hrs, do not cut your bread before, even though it seems like a nice treat to do so. Don't! It will make your bread dry and go stale faster. We want good bread like this, don't expect wheat like properties when baking with einkorn, expect this type of crumb, elastic, softness and a lovely crust the first day.
Notes
I really love this bread, even though it isn’t made with freshly milled flour, it’s still a very good loaf and the taste is just lovely. The first days we enjoy it as it is and then we use it for grilled sandwiches, they are sooo good! If your kids don’t like the crust just cut it off and save it for later, I use them for breadcrumbs so I don’t ever have to buy it in the store. Enjoy making this loaf and never hesitate to ask questions in the comments below. Have a blessed day!
Much Love in Christ

P.S. all posts on this blog are written and photographed by Belle Frost, no AI has been used to generate content and all Copyright belongs to Maison Frost.


Leave a Reply